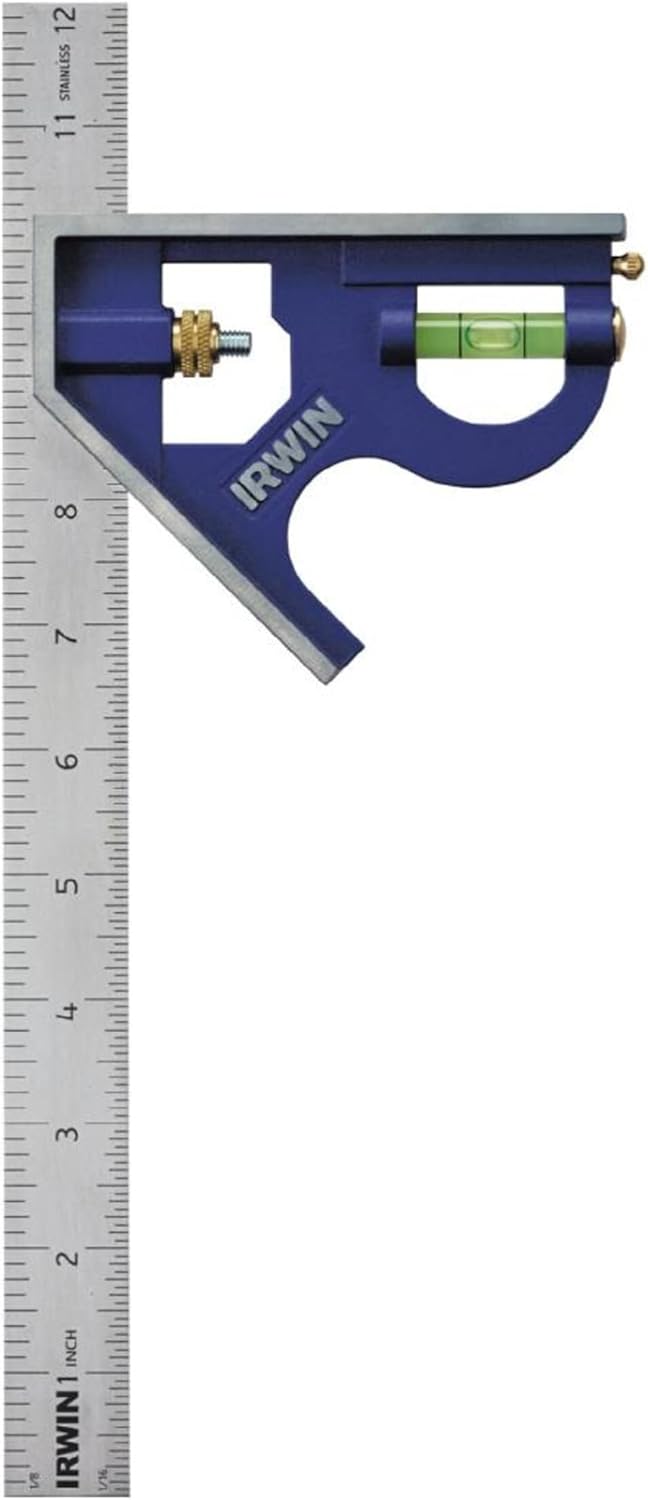
A square is only useful when it is actually square. Even a small drop can knock a blade or head out of true, so checking a square before an important layout is a good habit. The quickest way to verify accuracy is the line-and-flip test, which works for framing squares, speed squares, and combination squares alike.
What You Need
You do not need much to run the test. Gather these items:
- A straight reference edge. A factory edge of plywood or a straight piece of dimensional lumber works, but first make sure the edge is true. For a quick check, lay your straightedge on a flat surface, draw a line along its edge, rotate the piece 180 degrees, and draw a second line next to the first. If the edge is straight, the two lines will align exactly.
- A fine marker or sharp pencil. A mechanical pencil with thin lead is ideal because it leaves a narrow, precise line. A thick marker can hide small errors.
- A clean square. Wipe the lip, head, and blade so no sawdust, metal chips, or sticky residue sits between the square and the reference edge.
- A small flashlight, if needed, to inspect gaps between the square and the reference edge.
- For adjusting a combination square, you may also need a small screwdriver or hex wrench that fits the head’s locking screw.
A reliable reference edge is the foundation of the test. For an overview of other layout tools that work well with a square, visit the measuring and layout tools section.
Line-and-Flip Test Basics
The line-and-flip test uses the square itself to reveal error. The idea is to draw one line, reverse the square, and draw another line from the same setup. If the square is true, the two lines form a single continuous line. If the square is off, the lines will diverge.
Step-by-step
- Place the square’s body, lip, or head firmly against a true straight reference edge.
- Draw a line along the blade or the 90-degree edge of the square. Keep the pencil vertical and press lightly to avoid a wide, wobbly line.
- Flip the square over (face down), keeping the body, lip or head against the same reference edge, and slide it up to the first line.
- Draw a second line along the same edge of the blade, right on or next to the first line.
- Look at the two lines. If they fall exactly on top of one another, the square is true. If they form a small V or diverge, the square is out of square.
Checking Speed Squares
A speed square has a triangular shape with a lip along one side. The lip is what registers against the edge of a board, so it must be clean and free of dings. Use the line-and-flip test on the 90-degree edge.
- Hold the speed square’s lip against a straight board edge.
- Draw a line along the perpendicular side of the triangle.
- Flip the square over, keeping the lip against the same edge, and bring the same side up to the line you drew.
- Draw a second line. If the two lines line up, the square reads accurately.
Most speed squares are not adjustable. If the test fails by a visible amount, look for a burr on the lip. A fine file can be used to lightly dress the burr. If the square is still not true, it has likely been bent or dropped, and the safest choice is to replace it.
Checking Combination Squares
Combination squares have a movable head that slides along a steel rule. That head can shift out of perpendicular, so you should test the square before relying on it. Run the same line-and-flip test.
- Lock the rule in the head so it cannot slide or rotate.
- Press the head’s reference face against a true straight edge. The rule should extend across the work surface.
- Draw a line along the entire length of the rule.
- Flip the square over so the head contacts the same reference edge and the same edge of the rule meets the first line.
- Draw a second line. If the lines are one continuous line, the head is square to the rule.
You should also check the rule itself for straightness. Lay the rule on a flat surface and press down near the middle. If it rocks or if you can see a gap under the blade, the rule is warped. A bent rule cannot be used for accurate layout.
Adjusting a Combination Square
Some combination squares allow you to adjust the head so it sits at exactly 90 degrees to the rule. The method depends on the design. Look at the head to see if there is a small set screw near the pivot, or a screw that holds a replaceable anvil. Before adjusting, check the manufacturer’s instructions for your specific tool.
Follow the maker’s procedure for your model, make one small change at a time, and rerun the flip test after each change until the two lines become one.
If the head is riveted or you cannot find an adjustment screw, do not force it. An adjustable head usually has a visible pivot or anvil screw; if your square does not have that feature, treat the square as fixed and replace it if it fails the test.
Why Squares Go Out of True
Squares go out of true for three common reasons:
- Drops and impacts. A square landing on a corner can bend a blade or knock a head out of place. A combination square is especially vulnerable because the head can shift relative to the rule.
- Heavy pressure. Clamping a square in a bench vise, using it as a pry bar, or knocking it hard against a worktop can distort a thin blade.
- Burrs and foreign matter. A tiny ding on the lip or the head’s reference face creates a visible gap between the square and the board. The square may still be geometrically true, but it will not read correctly. A burr can also be caused by metal-on-metal contact in a toolbox.
Even a sawdust chip or a dried paint smear under the head can make the square sit off the edge. That is why cleaning is the first step of any accuracy test.
Storage Tips
Good storage keeps a square accurate between projects. Hang squares on a wall rack or keep them flat in a drawer. Do not toss them loose into a toolbox where they can collide with wrench sockets, screwdrivers, or other metal tools.
For a combination square, lock the rule in the head before storing it. A locked rule is less likely to slide and strike the head when the tool is jostled. Keep the rule’s blade protected and avoid stacking heavy tools on top of it.
If you work in a humid space, keep the square dry and apply a light film of oil or rust inhibitor to bare metal. Wipe off any accumulation of sawdust or pitch from the blade before using it.
Common Mistakes
The line-and-flip test is simple, but a few mistakes can make a true square look bad or a bad square look good.
- Using a curved reference edge. The straightedge itself has to be true. Test the reference edge first.
- Skipping the cleaning step. A burr or chip under the lip immediately changes the angle.
- Using a thick pencil line. A wide line can hide a small gap between the two drawn lines. Use a fine lead and a light touch.
- Not locking a combination square’s rule. If the rule shifts while you draw, the test is worthless.
- Flipping against a different edge. The square must be flipped over with its reference face against the same edge for both lines.
- Assuming another square is true. The only way to verify without a known reference is to run the line-and-flip test on the tool you are checking.
Troubleshooting
Here are some common problems and what they mean. This table is for guidance; always follow the manufacturer’s maintenance instructions.
| Problem | Likely Cause | What to Try |
|---|---|---|
| Lines diverge slightly after the flip | Square is out of true or has a small burr on the reference face | Clean the square and inspect for burrs. If the square is adjustable, make a small adjustment. For fixed squares, replace if needed. |
| Lines are parallel but not one continuous line | The reference edge may not be straight, or you did not keep the square’s body against the same edge | Check the straightedge with its own line-and-flip test. Repeat the square test carefully. |
| Square wobbles against the reference edge | Loose head, worn lip, or a bent rule | Tighten any locking screw on a combination square. Inspect the rule and head for damage. |
| Combination square rule slides through the head | The locking mechanism is loose or worn | Tighten the locking screw. If the screw is stripped, the head may need to be replaced. |
| Large gap between the two lines | Blade is bent from a drop or heavy pressure | Do not try to bend the blade back. A bent square can be unpredictable; replace it. |
FAQ
How often should I check a square?
There is no fixed interval. Check a square any time it has been dropped, knocked, or stored loosely with other tools. It is also a good practice to run the line-and-flip test before a critical layout, because the test takes only a minute.
Can I fix a bent square?
A slightly loose head on a combination square can be adjusted as described above. A bent blade on a fixed square is much harder to correct. Bending it back usually leaves a visible curve and can create internal stress that makes the tool inaccurate. If a square fails the line-and-flip test by a visible amount, replacement is the safer choice.
Why does my new square fail the test?
A new square can have a small burr on the lip or head from manufacturing. Wipe the tool clean, lightly dress any burr with a fine file, and retest. If the square still fails, it may have been damaged during shipping or handling, and you should not rely on it.
What if I only have a round or rough edge to test against?
The line-and-flip test needs a true straight edge. If you cannot find one, try a factory-cut edge of plywood or a straight piece of edge-glued board. You can also use a piece of thick sheet metal or glass from a picture frame, as long as it is flat and smooth.
Checking a square is a quick and worthwhile habit. Use the line-and-flip test before a critical layout, clean and store your squares properly, and if a combination square has an adjustment screw, dial it in until the two drawn lines become one. You will get more consistent cuts and assemblies when every square in your shop reads true.