Speed Squares, Combination Squares, Framing Squares, and Try Squares: A Complete Guide
If you are starting out with woodworking or home improvement, you will quickly discover that not all squares are the same. A speed (rafter) square, a combination square, a framing square, and a try square each serve a different purpose. This guide explains what each type does, how to use them for marking angles, checking joinery, laying out stairs or rafters, and how to test a square for accuracy. You will also learn which square to buy first based on the projects you plan to tackle.
What Each Square Is and Who It Suits
Speed Square (Rafter Square)
A speed square is a triangular tool made of aluminum or plastic. It has a raised lip (fence) along one edge that hooks onto the edge of a board, plus a marked pivot point for laying out angles. It is designed for quick marking of common angles such as 45 and 90 degrees, and for laying out rafters and stairs. The speed square is lightweight, fits in a tool belt pouch, and is ideal for framing, roofing, and general carpentry. Beginners and experienced DIYers alike find it useful because it replaces a protractor and a framing square for many tasks.
Combination Square
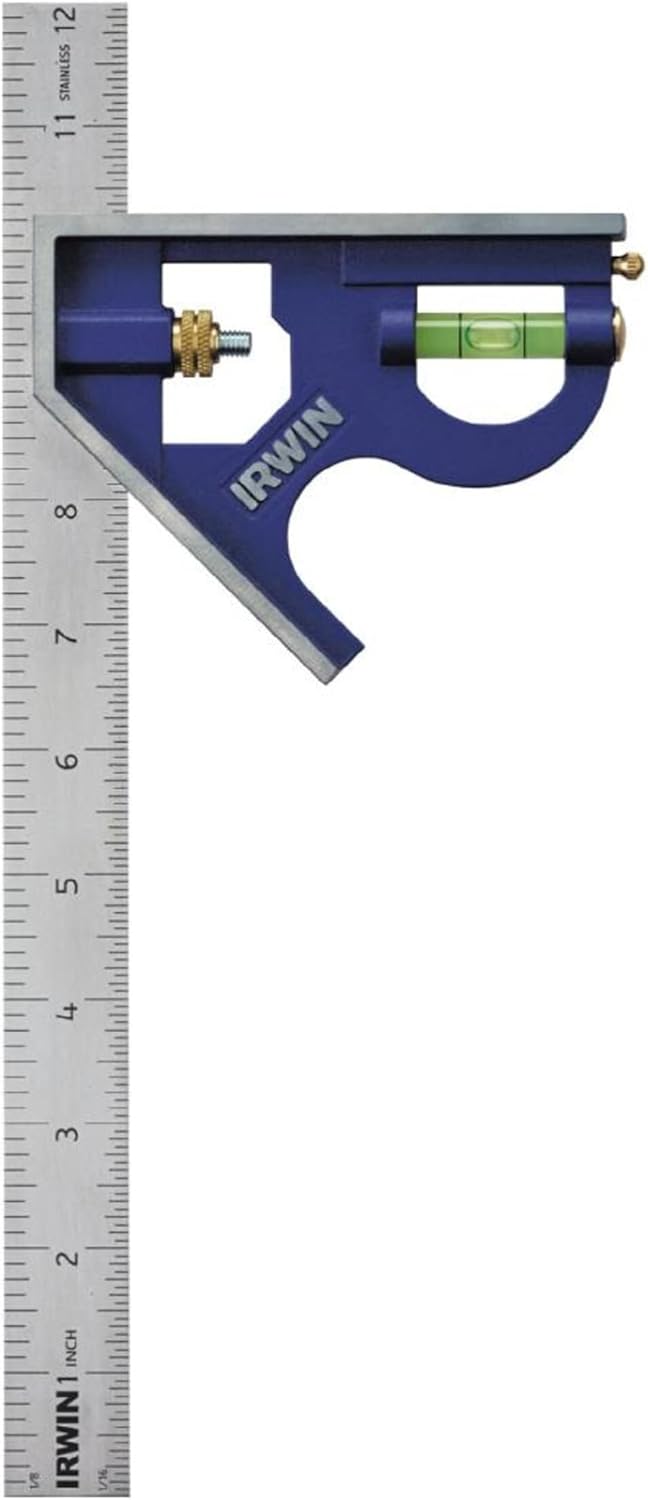
A combination square consists of a steel ruler (blade) and a sliding head that locks at different positions. The head has a 90-degree and a 45-degree face, and often includes a small spirit level and a scribing pin. You can use it as a depth gauge, a marking gauge, a try square, and a miter square. It is the most versatile square for fine woodworking, cabinetry, and metalworking. A combination square is a good first purchase because it covers many layout tasks.
Framing Square
A framing square is a large L-shaped tool, typically made of steel or aluminum, with a long arm (the body) and a shorter arm (the tongue). It is used for laying out rafters, stair stringers, and large joinery. The framing square has tables and scales stamped into the metal that help you calculate rafter lengths and angles. It is a traditional tool for house framing and is still widely used by carpenters. For a DIYer building a deck, shed, or staircase, a framing square is very helpful.
Try Square
A try square has a wooden or metal handle (the stock) and a thin steel blade fixed at a perfect 90-degree angle. It is used to check the squareness of edges, mark lines perpendicular to a face, and test joints during assembly. Try squares are common in fine woodworking and joinery, such as dovetails, mortise-and-tenon, and box making. They are less versatile than a combination square but offer a dedicated tool for checking right angles.
Main Types and How They Differ
| Square Type | Primary Uses | Key Features |
|---|---|---|
| Speed Square | Rafter layout, stair angles, quick 45/90 marks, saw guide | Triangular body, fence lip, pivot point, angle markings, often has a rafter table |
| Combination Square | Depth gauge, 45/90 marking, center-finding, level, scribing | Sliding head with level, removable blade, adjustable |
| Framing Square | Rafter and stair stringer layout, large framing | Large L-shape, stamped tables for rafter lengths and angles |
| Try Square | Checking squareness, joinery layout, fine woodworking | Fixed 90-degree blade, wooden or metal stock, precision ground |
Features That Actually Matter
Material and Durability
Speed squares are often made of aluminum to keep them light, but plastic versions are cheaper and still accurate enough for rough framing. Combination squares usually have a hardened steel blade and a cast-iron or aluminum head. Look for a blade that is stamped with clear, etched markings that will not wear off. Framing squares are typically steel; a rust-resistant coating or stainless steel is a plus. Try squares with a rosewood handle and brass-faced stock are traditional and hold up well, but all-metal versions are also common.
Accuracy and Graduations
For any square, the accuracy of the 90-degree and 45-degree angles is critical. A quality combination square should have a blade that is straight and a head that locks firmly without play. Framing squares should have a true right angle; you can check this with the draw-and-flip test described below. Speed squares are generally accurate enough for construction, but if you need fine joinery, a try square or combination square is better. Look for graduations in both inches and metric if you work with both systems.
Additional Functions
A combination square with a built-in spirit level lets you check level and plumb. Some heads have a scribing pin for marking lines parallel to an edge. Speed squares often include a protractor scale for cutting rafters and a diamond-shaped cutout for marking common rafter angles. Framing squares have tables that show the length of common rafters per foot of run. Try squares are simple but often have a brass face on the stock to prevent wear and keep the blade square.
Sizing, Fit, and Compatibility
Speed Square Sizes
Speed squares are typically sized by the length of the flange, commonly 7 inches or 12 inches. A 7-inch square fits in a tool belt and is good for most marking tasks. A 12-inch square gives you a longer straightedge and is useful for cutting drywall or plywood. Choose the size that matches the scale of your projects.
Combination Square Blade Lengths
Combination squares come with blades from 6 inches up to 24 inches or more. A 12-inch blade is a versatile starting point. A shorter blade is easier to handle for small joinery, while a longer blade helps with marking across wide boards. Some combination squares allow you to replace the blade with a different length or with a center-finding head.
Framing Square Dimensions
Framing squares are usually 24 inches by 16 inches or 24 inches by 18 inches. The longer arm (body) is 24 inches, and the shorter arm (tongue) is 16 or 18 inches. This size is standard for roof framing and stair layout.
Try Square Sizes
Try squares range from 6 inches to 12 inches for typical woodworking. A 6-inch square is handy for dovetails and small boxes, while a 12-inch square is better for checking panels and casework. The blade should be thin enough to fit into tight corners but stiff enough to remain straight.
Common Buying Mistakes
Buying a Cheap Square That Is Not Square
The most common mistake is buying a square that is not actually square. Inexpensive squares may have a blade that is not perfectly perpendicular to the stock. Always check the square before you buy, and if you order online, test it as soon as it arrives using the draw-and-flip test. A square that is off by even a small amount will cause errors in your projects.
Ignoring the Scale and Markings
Some squares have markings that are hard to read or that wear off quickly. Look for laser-etched or stamped markings that are deep and clear. A square with a painted scale may become illegible after a few uses. Also, make sure the graduations match the units you use (inches, metric, or both).
Buying a Combination Square without a Level
If you plan to use the combination square for checking level or plumb, choose one with a built-in spirit vial. Not all combination squares include a level. The level is a small bubble vial set into the head. It is very useful for setting up saw blades, workbenches, or hanging cabinets.
Buying a Framing Square That Is Too Large or Too Small
A full-size framing square (24 by 16 inches) is the standard for roof and stair layout. A smaller square may not have the tables you need. Conversely, a full-size square can be awkward for small projects. Match the size to the work you do most often.
Care, Cleaning, and Upkeep
Keep Squares Clean and Dry
After use, wipe the square with a clean cloth to remove sawdust, glue, or moisture. Steel squares can rust if left damp. Apply a light coat of machine oil or a rust inhibitor to the blade and head, especially if you work in a humid environment. Aluminum squares are less prone to rust but can still get dirty; clean them with a mild solvent if needed.
Store Squares Properly
Do not throw squares loose in a toolbox where they can get knocked out of true. Hang them on a pegboard, store them in a drawer with a protective sleeve, or keep them in a dedicated tool roll. A combination square should be stored with the head loosened to avoid warping the blade. A try square should be kept in a dry place to prevent the wooden stock from swelling.
Check Accuracy Periodically
Even good squares can go out of square if dropped or abused. Perform the draw-and-flip test (described below) every few months or after any impact. If a square is out of true, you may be able to adjust a combination square by filing the head or replacing the blade. Framing squares and try squares are harder to adjust; if they are significantly off, replace them.
How to Check a Square for Accuracy: The Draw-and-Flip Test
This simple test works for any square that has a straight edge. You will need a piece of wood or metal with a straight edge (a factory edge of a board works well).
- Place the square against the straight edge so that the blade lies flat on the workpiece.
- Draw a fine line along the blade with a sharp pencil or marking knife.
- Without moving the straight edge, flip the square over so that the blade is now on the opposite side of the line you just drew.
- Align the heel of the square (the corner where the stock meets the blade) with the same point on the straight edge, and see if the blade aligns exactly with the line you drew.
- If the blade matches the line, the square is accurate. If there is a gap between the line and the blade, the square is out of square. The gap will be twice the actual error because you flipped the square.
For a combination square, also check the 45-degree face by using the same method but using a 45-degree angle reference. For a framing square, perform the test on both the inside and outside corners of the square.
Which Square to Buy First
If you are a beginner, start with a combination square. It covers the most tasks: marking 90-degree and 45-degree angles, depth measurements, checking level, and scribing lines. A 12-inch combination square with a level is a versatile tool that will serve you in carpentry, woodworking, and metalworking. Add a speed square next if you plan to do any framing, decking, or simple angle cutting. A speed square is inexpensive and very handy for quick layout. If you build stairs or a roof, a framing square becomes necessary. A try square is a later purchase for fine joinery, but you can often use a combination square for the same purpose until you need higher precision.
FAQ
What is the difference between a speed square and a framing square?
A speed square is a small triangular tool used for quick angle marking and rafter layout. A framing square is a large L-shaped tool used for laying out rafters, stair stringers, and large framing. The speed square is more portable and easier for small cuts; the framing square provides longer reference edges and built-in rafter tables.
Can I use a combination square as a try square?
Yes, a combination square can function as a try square when the head is locked at 90 degrees. However, a dedicated try square is often more precise and has a thinner blade that fits into tight corners. For most DIY joinery, a quality combination square is sufficient.
How do I find the center of a board with a combination square?
Many combination square heads have a center-finding feature. Place the head against the edge of the board and extend the blade to the approximate center. Then use the scribing pin or a pencil to mark a line. Flip the head to the other side and mark another line; the center is between the two lines. Alternatively, use the 45-degree face to mark a V-shaped line and measure the midpoint.
What is the best way to mark a 45-degree angle with a speed square?
Hold the speed square with its flange against the edge of the board. The 45-degree line is marked on the square; simply align the line with the edge and draw along the hypotenuse. For a miter cut, you can also use the square as a saw guide by clamping it in place.
How do I check if my framing square is accurate?
Use the draw-and-flip test described above. For a framing square, also check the inside corner by drawing a line along the inside of the blade and then flipping the square to see if the line aligns. If the square is off, it is best to replace it, as adjusting a framing square is difficult.
Which square is best for cutting rafters?
A speed square is the most common tool for cutting rafters because you can rotate it on its pivot point to mark roof pitches quickly. A framing square with rafter tables is also excellent for calculating rafter lengths. Many carpenters use both: the speed square for marking the angle and the framing square for laying out the birdsmouth and plumb cuts.
Do I need a try square if I already have a combination square?
Not immediately. A combination square can handle most tasks that a try square does. However, if you get into fine woodworking where you need to check joints repeatedly, a try square is more convenient and often more accurate because it has no moving parts. It is a worthwhile addition once your projects demand higher precision.
Final Thoughts
Choosing the right square depends on your projects. A combination square is the most versatile and should be your first purchase. Add a speed square for quick angle work and a framing square for larger structures. A try square is a specialist tool for joinery. Always check the accuracy of your squares with the draw-and-flip test, and keep them clean and dry. With the right square in hand, you will lay out cuts and assemble projects with confidence.
For more on measuring and layout tools, see our measuring and layout tools guide. If you are working with studs or walls, our stud finder guide may also be helpful. For a broader look at squares, visit the squares page.