By Caleb Morgan
Updated November 2026
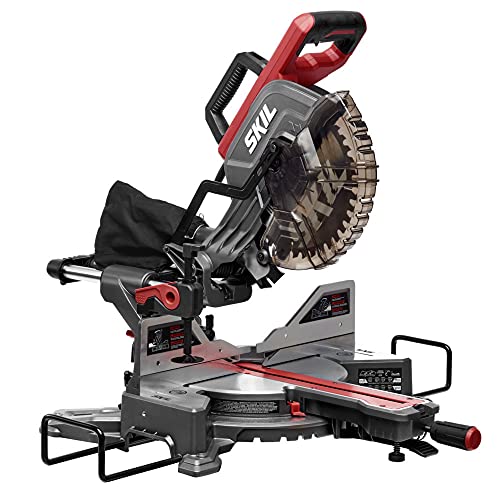
Learning how to work a miter saw comes down to four things: setting the saw up square, holding the workpiece firmly against the fence, letting the blade reach full speed before it touches wood, and guiding the cut through with steady, controlled pressure. Once those habits are in place, you can cut repeatable angles for trim, framing and molding with far less waste.
Set Up the Saw Before You Cut
Start on a flat, stable surface. A saw that rocks on an uneven bench will drift off its angle setting, and that shows up as gaps in your joints. Check that the blade is seated correctly and the guard retracts freely. If you are new to the tool, review the manufacturer’s manual for the specific detent positions and lock knobs on your model.
Shopping for one? See our guide: 3 Best Miter Saw Work Tables for Job Sites and Shops: Picks Compared (2026).
Next, confirm the saw is square. Set the miter angle to 0 degrees and the bevel to 0 degrees, then test with a known square against the blade and fence. If you need to adjust, the manual will show where the fence and detent stops are calibrated. Many owners find it worthwhile to make a test cut on scrap and check the result with a square before trusting the saw for finish work.
Make Your First Miter and Bevel Cuts
A miter cut angles the blade left or right across the board. A bevel cut tilts the blade so the cut is angled through the thickness of the stock. Compound cuts combine both. For each cut, follow the same sequence:
- Set the miter angle and bevel angle, and lock them. Check that the detent pin has seated fully.
- Place the board flat on the table with its best face down and its edge firmly against the fence.
- Hold the board with your hand well away from the blade path, at least several inches from where the blade will exit.
- Squeeze the trigger and wait for the blade to reach full speed.
- Lower the blade through the cut with a smooth, steady motion. Let the blade do the work rather than forcing it.
- Keep the blade down until it stops completely, then raise it and release the trigger.
Cut Repeatable Lengths and Angles
For matching pieces, such as the four sides of a picture frame or a run of base molding, use a stop block clamped to the fence. Measure from the blade to the stop, not from the end of the fence, because the blade kerf affects the result. Cut each piece with the same edge against the stop, and check the first cut before committing to the rest.
For opposing angles on framing or trim, a common approach is to cut the first end, flip the board, and cut the second end to the same setting. Mark which side is which before you cut. A simple table can help keep your common settings straight:
| Common joint | Typical miter setting | Notes |
|---|---|---|
| Picture frame corner | 45 degrees | Two pieces meet to form 90 degrees |
| Square corner on a box | 45 degrees | Same setting, different stock thickness |
| Crown molding (spring angle) | Varies | Check your molding’s spring angle and the manual’s compound chart |
Common Mistakes to Avoid
- Cutting before the blade reaches full speed, which causes tear-out and binding.
- Letting hands drift near the blade path, especially on short offcuts. Use a longer piece or a clamp instead.
- Forcing the blade down hard. A dull or wrong-type blade will burn and wander.
- Skipping the calibration check. A slightly off detent can ruin an entire run of trim.
- Measuring from the fence end rather than the blade. The kerf will shorten every piece.
Recommended Gear
A sturdy clamp keeps workpieces locked to the fence and table, which matters most on short or narrow stock. View on Amazon
A dedicated stop block gives you repeatable lengths without re-measuring each piece. View on Amazon
A quality crosscut blade with a high tooth count leaves smoother edges on finish wood. View on Amazon
For more on the saw’s accessories and related setup, see Fence for Miter Saw: How to Build One That Stays Square (2026) and Miter Saw Stop Block: How to Set One Up for Repeatable Cuts. If you are cutting molding specifically, Miter Saw for Molding: How to Make Clean Crown and Base Cuts (2026) covers the angle math in more detail.
FAQ
Do I need to hold the workpiece tightly against the fence?
Yes. Keep the stock firmly against the fence and flat on the table during the entire cut. Movement during the cut is the most common cause of inaccurate angles.
How do I know if my miter saw is square?
Set both angles to zero and check the blade against a reliable square. If the blade is not perpendicular to the table or fence, follow the manufacturer’s calibration steps.
Should I wait for the blade to stop before lifting it?
Yes. Keep the blade down until it has stopped spinning completely, then raise it. Lifting early can cause the blade to catch and throw the workpiece.
Conclusion
Working a miter saw well depends on a square setup, firm workpiece support and a controlled, full-speed cut. Practice on scrap until your settings and stop positions feel routine. Consult the manual for your specific model, and when in doubt about safe technique, ask an experienced tradesperson to observe your setup.
Related reading
Ready to choose one?
About Caleb Morgan
Caleb Morgan is part of our editorial team and reviews and edits our power tools guides, checking product details against manufacturer specifications and owner feedback.